Temenos Lifecycle Management Suite - Origination Product Guide
Account Product Check Image Field
| Administrator Guide > Virtual Capture Overview > Virtual Capture Screens > Field and Panel Configuration Examples > Account Product Check Image Field |
When the Check Image field is configured to appear in an Account Product panel for Virtual Capture, applicants are able to determine the information that displays on the initial checks issued for an account product during the virtual application process.
This topic provides an overview of the configurations required to display a check image for customization in an instance of Virtual Capture, as well as an example of how the Check Image functionality works in a virtual application.
When configuring the Check Image functionality for use in Virtual Capture, system administrators are able to determine the sample check image that populates in the virtual application for each instance, define the instructions that display to assist applicants in customizing the check image, as well as configure not only the required and optional fields available to add to a check, but also the display order of the fields in the check image.
The following section walks through the configurations that must be performed in Temenos Infinity in order to use the Check Image functionality in Virtual Capture.
The image and instructions displayed for the Check Image field are configured within the Branding tab in System Management > Origination > Virtual Capture > Virtual Capture Settings. These settings are configurable by instance; therefore, can be modified to display differently for a particular group of applicants.
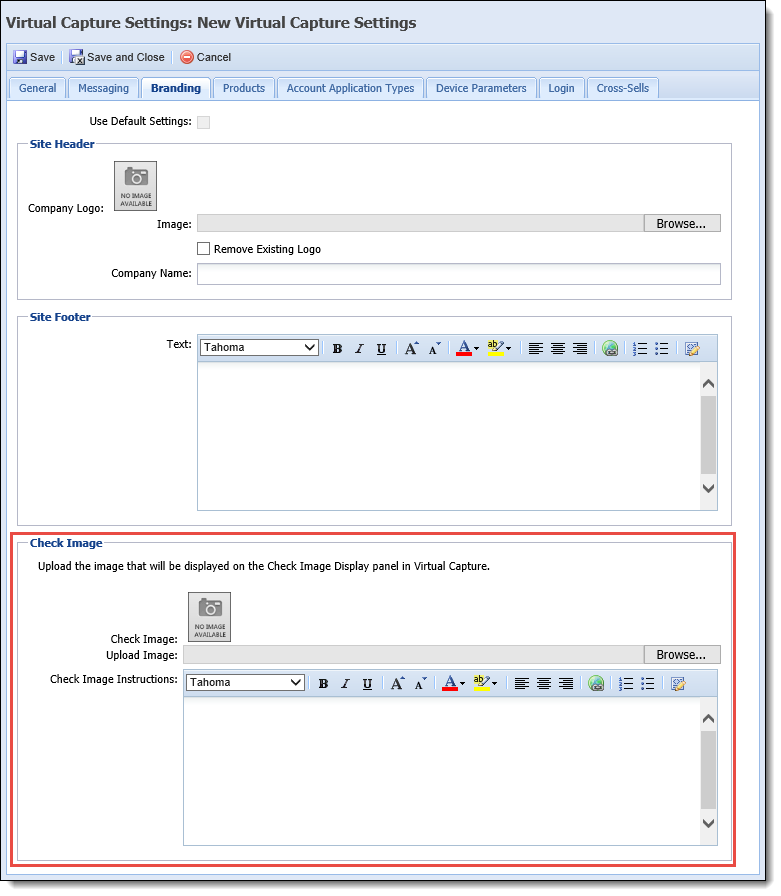
Within the Check Image section, click Browse... to locate and upload the image to be used to display data for the Check Image field in Virtual Capture.
 |
An ideal check image to use in Virtual Capture is 50 pixels x 50 pixels. |
Once an image is uploaded, enter text in the Check Image Instructions that assists applicants with customizing their checks during the virtual application process.
When the check image and instructions have both been configured, click  to retain the configurations.
 |
For more information, please see the Branding section of the Virtual Capture Settings topic in this guide. |
In order for the Check Image functionality to be available in Virtual Capture, the Application > Check > Check Image field must be configured to appear in an Account Product (Repeating) panel on an Application screen in System Management > Origination > Virtual Capture > Virtual Capture Screens.
 |
The following recommendations should be considered when adding the Check Image field to an Account Product panel, and assigning the Account Product screen that includes the panel to a Virtual Capture Workflow Model:
|
Once the Check Image field is added to an Account Product panel, the Properties tab updates to display a section to configure the properties for the Check Image field in Virtual Capture.
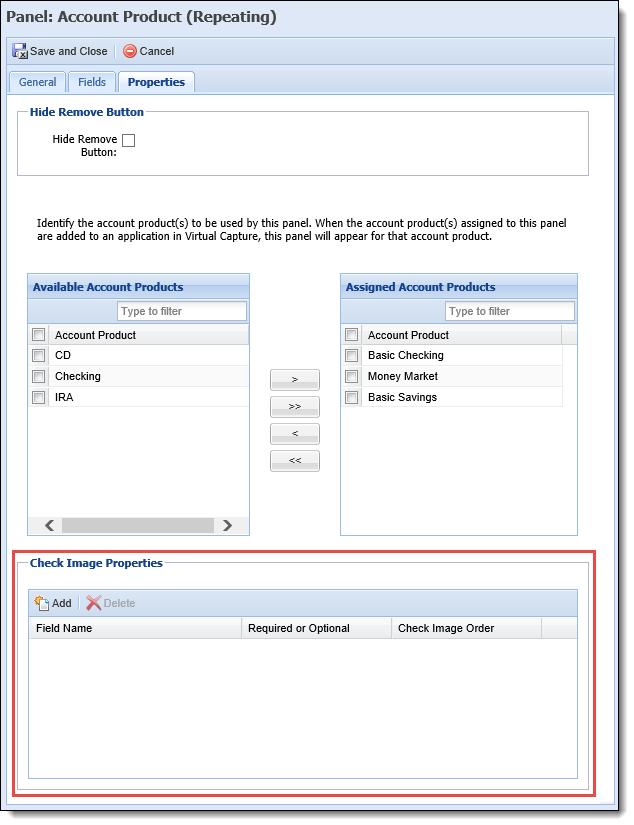
Within the Check Image Properties section of the tab, administrators are able to use the  and
and  buttons in the top of the grid to manage the fields that appear for the Check Image in Virtual Capture.
Clicking  populates an editable row in the grid to define the following information for each column:
|
Once a row is added to the Check Image Properties, a value must be defined for each column in order to save the panel. An error is received upon saving the panel if a value is not defined for Field Name, Required or Optional, and Check Image Order in each row. |
| Column | Description | ||||||
| Field Name |
Select one of the following values to display as a line on the check image:
|
||||||
| Required or Optional |
Select Required or Optional to identify whether a field set is required to appear as a line in the check, or is available as an optional value for the applicant to add to the check if desired.
Required fields are automatically added to the check image, and cannot be removed. Optional fields are listed alongside the image with a check box that allows applicants to add or remove the field from the check image as desired.
|
||||||
| Check Image Order |
Enter a number to identify the order in which the field should appear in the check image.
|
Once all properties are configured, click to retain the panel configurations.
|
For more information on screen and panel configuration, please see the Virtual Capture Screens topic in this guide. |
When a panel including the Check Image field renders in an instance of Virtual Capture, a Check Display section populates in the panel, which presents applicants with the image uploaded in Virtual Capture Settings, and automatically populates the fields assigned to the Check Image Properties with information for the applicant(s) associated with the application.
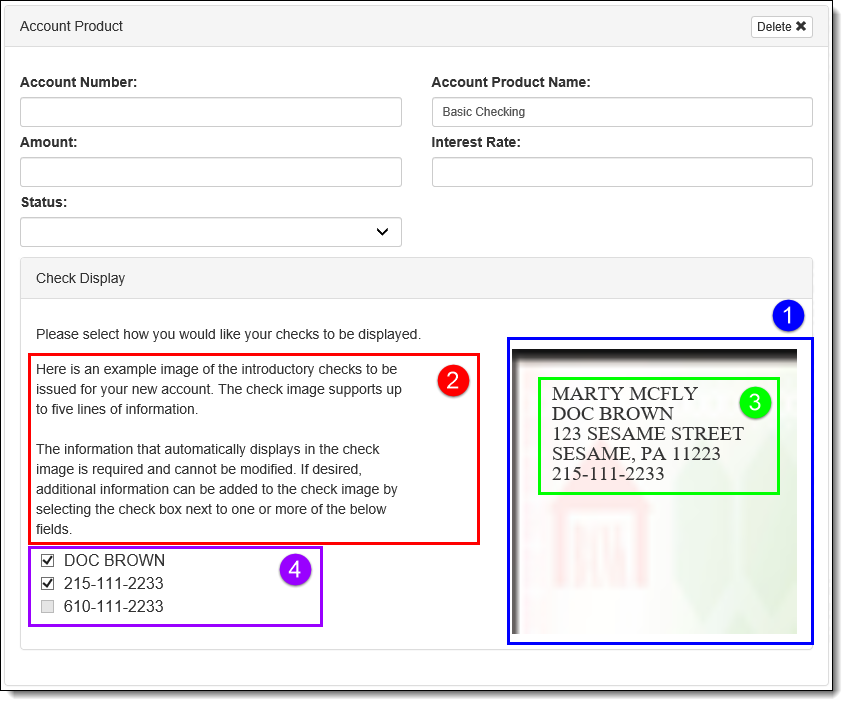
The Check Display section includes the following information:
Displays the check image uploaded for the instance within the Branding tab in System Management > Origination > Virtual Capture > Virtual Capture Settings. This image is used as an example for applicants to view how demographic information appears on their introductory checks before they are issued.
When the panel renders, the image automatically populates with five lines of applicant data in the fields assigned to the Check Image Properties. The fields in the image update as applicants add and remove optional data from the check image.
|
If an image is not uploaded, applicants are able to configure fields for the check image in Virtual Capture, but a |
|
When hovering over the check image, Virtual Capture indicates alternate text that is available to applicants using a screen reader. The alternate text for the check image consists of following text concatenation: <Company Name> + "Check Image." |
Displays the fields configured to appear on the check. Applicants are able to add up to five lines of data to the check image.
When the panel renders, the image automatically populates five lines of applicant data in the fields assigned to the Check Image Properties during panel configuration.
One line of data automatically populates for each required field. The additional lines consist of data for the first optional field(s) assigned to the Check Image Properties that include a value in the application. For example, if the Check Image is configured to include three required fields, and three optional fields, the check image populates with applicant data for the three required fields, as well as data for the first two optional fields in the check image order that include a value in the application.
In the above image, the following fields are required:
Since only three fields were marked required, the following two optional fields also populate within the image, as they were the first two optional fields in the check image order that include a value in the application:
The location of the fields in the image is determined by the value assigned to the fields for the Check Image Order in the Check Image Properties.
|
The order of the fields cannot be modified by the applicant, and is only managed by the system administrator within the Properties tab in System Management > Origination > Virtual Capture > Virtual Capture Screens. |
Required fields cannot be removed from the image, but applicants are able to add and remove optional fields as desired using the check boxes that appear to the left of the image. The fields in the image update as applicants add and remove optional data from the check image.
Displays the optional fields assigned to the Check Image Properties. Each field is listed with a check box that provides applicants with the ability to add and/or remove the field from the check image.
When a check box is selected, the field is automatically added to the check image in the location defined for the Check Image Order. Clearing a check box removes the field from the check image.
Since applicants are only able to include up to five lines of data in the check image, check boxes for any optional fields that do not appear in the image are disabled once five lines have been added, as shown for 610-111-2233 in the above example. Applicants must clear a check box to remove a field from the check image in order to re-enable a check box for a different field.
|
Watch the following video to see the Check Image field in action:
|
 1 - Check Image